plan paddock design with straight lines and 660 feet or less to strip graze. In a perfect world this could happen, in reality, there are draws, copses, deep ditches, travel situations which the livestock will simply never figure out, washouts, timbers, etc, etc, ad nauseum. But shoot for that layout as much as possible. Whether you aspire to total grazing, MiG (management-intensive grazing), adaptive grazing, mob grazing, the rectangular paddock with water source less than 800 feet (Paul Peterson was a lead in this study funded through SARE back in 1994) is about as an ideal for a scheme that requires much flexibility in fencing, grazing, and producer mindset.
But remember to balance cost and time with grazing efficiency. In other words, if the paddock is most effective with a good water source 1000 feet, then that may be the best strategy.
With paddocks designed utilizing 1.22 inch fiberglass posts about 50 feet apart (more closely spaced posts of course depending on terrain – north Missouri with undulating land, deep ditches, and timbers will frequently require closer placement than that). Using 1.22 inch posts provides a firm post for hooking onto for strip grazing at both ends.
As i prepare for the future in following guidelines for total grazing, i’m grazing this area intensively with temporary fencing for now. However, i do not plan to have to do this in the future. Far too much work and i’m allergic to work.
Here’s the other end utilizing two pig tail posts with braces toward the pull. The handle carries a charge through it so that is hooked into the ‘live’ wire. There is too much flex with temporary posts which is why i’ve used two. This is a 775 foot stretch so i have to use a lot of step in posts to hold up the polybraid since i cannot stretch it very tightly utilizing these makeshift ends.
Here’s my on-the-fly fix for a temporary end post. Most of the time, these 1.22 inch fiberglass posts can be pulled up by hand. Note my makeshift hook (adulterated cotter pin) for the reel.After the fiberglass is pulled up by hand, then it needs redriving in the next location along with the leap frogged polybraid and reel. Yes, i paint my driver orange so we can find them and not leave them planted all over the farm. Thankfully, the driver slid right over my makeshift hook so i didn’t have to remove and replace it. Snow was starting to come down and i was getting cold.Better manure distribution with total grazing or some other managed program.Cattle are restless today with snow and ice coming in. Thankfully not going to get super cold, but the wind is sharp. They have a nice timber to get in out of the wind if needed.If that break for grazing looks like a lot of area, you are right, there really isn’t much volume but yet it still needs cleaning up. Also, we are now getting ice on top of snow (3 hours after this photo was taken) so i’m giving them enough to get by in case i can’t get to my farm due to slick roads tomorrow.Where are the now? they are on the north side of the orangish line. the orange line from extending from the timber to perimeter fence is a polybraid temporary set up only for this grazing set up . The cows are being moved to the south in a fencing leap frog scenario.
There are very few reasons for mobs of livestock to have access to ponds beyond and emergency drinking water access. My reason here is that these heifers needed to be separated from the main cow herd for the 45 day breeding season and the only paddock I have does not have shade or even a high point to catch a breeze such as the pond dam where the heifers in the second photo are standing.
Ideally, allotting short term adequate shaded space is the optimal. Video below shows comfortable cows and calves.
In many cases, cattle not selected for heat tolerance will immerse themselves in a pond for relief. The flip side is that oftentimes these cattle will tolerate severe cold better than the others. We can spend decades selecting for the genetics which thrive in each of our unique environments and management. Hopefully also providing a quality eating experience for the consumer.
This is a jarring photo and i hesitate to post it, but reality is, we don’t live in a perfect world and sometimes we make do until improvements can be made. These purebred Angus heifers can’t tolerate much heat and humidity and stand in the pond. Not healthy for the pond or the cattle.
These heifers have up to 50% genetically selected heat tolerant breeds of either Longhorn or Corriente crossed with black or red Angus. Clearly more comfortable in Missouri heat and humidity.
The benefits of managing trees and timbers far outweigh the tree-hugger (an environmental campaigner used in reference to the practice of embracing a tree in an attempt to prevent it from being felled) concept of saving all or specific trees. Biblically, we are instructed to tend and keep the garden – not let it run rampant into total chaos. Work is not a four-letter word in the negative sense and it behooves us all to manage for effectiveness, efficiency, helpfulness, integrity, and beauty.
As Greg Judy shares, there are two ways to establish silvopasture or savannah. One way is to clear out dead or unproductive trees in existing timber or to plant a diverse mixture of productive and valuable trees. Planting and establishing a new timber will take decades before reaching its full potential, but if you didn’t start decades ago, might as well start now.
Unmanaged timbers will eventually become worthless – full of scraggly crooked trees which will never grow if the older trees are not harvested at their peak of quality. The heavy canopy old tall trees prevent youngsters from reaching their full potential. Even though the old fogy’s will eventually die, the young trees may never recover and the timber itself will fail. This may take a millennia, but why not manage it, sustaining, regenerating, as well as taking off a cash crop to help pay the bills.
Trees and timber are so important in our environment – for people, livestock, wildlife, soil. Shade is the first benefit which often comes to mind. Evapotranspiration is the ‘coolest’ sort of shade there is – much better than that provided by a shade cloth or roof. Additionally, we harvest fuel, wildlife, forage diversity, shelter, lumber, and a beautiful landscape. But management is more than harvesting, it also requires protection from overuse by livestock and even wildlife, yet on the flip side, excluding animal use will allow brush overgrowth and a buildup of fire fuel, which during a dry hot spell could catch fire and destroy your timber in a matter of moments.
Trees which are allowed to grow large around ditches, draws, and branches destabilize the banks. Their large roots won’t hold the soil as well as millions of deep rooted grass plants, so it’s best to keep those sprouts cut out so grass can grow. My observation is that once trees are removed, sunlight can reach the bank which allows the grasses to grow, especially with the ready supply of water! Include timeliness of livestock impact (to knock down the steep eroded banks) and grass will quickly cover those leveled areas as well. This all works together to hold soil, reduce erosion during what we call gully washers and slow the flow of water across the landscape. It’s a beautiful thing to watch the land heal.
Note how the left side is devoid of trees and the bank slope is less steep and covering with grass while the right side had a fairly large tree grown into the bank. It could not hold the soil which has washed out from under the tree and it is falling down and will become another liability not to mention the loss of potential lumber or fuel.
A word of caution in all this! It will not work if you hire a bulldozer and push out trees – roots and all. This moves too much soil which may cause a lot of erosion and make the scarring even worse. The trees must be harvested leaving the roots in place. I find it more attractive to cut the stumps fairly level to the surface, plus the convenience of not having a stump to run into, but it probably doesn’t make any difference from a soil saving aspect.
The final argument to address is to define my use of the word ‘management.’ One way to manage is to bulldoze, another is to clear cut, but i’m referring to managing for regeneration. Sustaining my unmanaged timber is not smart – improving for the next generation (regeneration) is more respectful all around.
Create something beautiful today!
tauna
These grassy banks will hold against much erosion around this pond. However, the roots of the trees on the right will grow through the bank eventually causing the pond to leak as well as shade out soil saving grasses.
In the first two stories of this series we covered some terms used in managed grazing, provided their definitions, and explained why the terminology and the ideas they represent matter.
In this third and final article of our managed grazing primer, we’ll cover some important concepts that aren’t based in terminology.
Plants: Taller and deeper is better
Early in the days of managed grazing there was a huge and largely mistaken emphasis on grazing plants in Phase II, or vegetative state.
Pushed to its logical end, this resulted in what then grazing consultant Burt Smith once commented about New Zealanders: “They’re so afraid of Phase III growth they never let their plants get out of Phase I.”
Young forage is high in nitrogen/protein and low in energy, while older forage is higher in energy and better balanced in a ratio of nitrogen/protein, although it has higher indigestible content.
This older attitude foiled the greatest advantages of managed grazing. It never let the plants work with soil life to build soil. It never let the grazier build much forage reserve for winter or for drought.
Last but not least, we were told for years the quality of taller, older forages was so poor that cattle could not perform on it. That is not necessarily true of properly managed, multi-species pasture where soil health is on an increasing plane and cattle are harvesting forage for themselves. It’s all in the management.
Balance animal needs with grass management
One of the most important concepts to managing livestock well on forage is to recognize livestock production and nutritional needs and graze accordingly.
When your animals need quality for growth or lactation, you shouldn’t demand they eat deep into the plant canopy, consuming older leaves and stems.
If you have dry cows or are dry wintering cattle, you might ask them to eat more of the plants.
Remember the highest quality in mature, fully recovered forage is near the top of the plants and the outer parts of newer or longer leaves
Again depending on livestock class and forage conditions, an affordable and well-designed supplement program can let you graze more severely, also.
Erratic grazing breeds success
Nature is chaotic and constantly changing, so your grazing management needs to be also.
If you graze the same areas the same way and same time each year, you will develop plants you may not want because they will try to fill the voids you are creating and you may hurt plants you desire because they will become grazed down and weakened, perhaps at critical times.
If you move those grazing times and even change animal densities and perhaps also add other grazing species, you will create more diverse plant life and soil life.
Remember, too, that your livestock don’t need to eat everything in the pasture to do a good job grazing.
Cattle legs are for walking
Water is always a limiting factor for managed graziers, but the low-cost solution in many cases is to make cattle walk back to water.
Certainly you can eat up thousands of dollars of profit by installing excessive water systems and numerous permanent water points.
This can be overcome to some degree with temporary fencing back to water and using existing water sources.
THis entry will serve two-fold; one as a page in the handbook i’m assembling about my little Tannachton Farm – not the day to day stuff, but the month to month stuff that happens each year, and secondly to address the questions received about the details about the solar pump used on my farm. It’s been 5 years now in use and i guess the gremlins are chased out because it is working great this year – i do hope i didn’t just jinx it!
All of the pipe and tanks on the solar system are laid out on top the ground; not buried 4 feet. Why? When i applied for and received an EQIP organic transition NRCS government aid that was/is the protocol.
Water pipe: black polyethylene HDPE 1.5 inch pipe purchased in 500 foot rolls. So, i unrolled (by hand!) about 4500 feet of 1 1/2 inch HDPE black pipe over that top of the ground to the stock tanks. The pipe is connected using Philmac fittings of the same diameter. The use of 1.5 inch pipe eliminates a great deal of friction. Build drive over uprights to eliminate heavy vehicles driving over pipes in gateways.
Water tanks: 10 galvanised tanks purchased from Hastings Equity Manufacturing in Nebraska. I needed high volume tanks because of the number of animals i would be watering and i like a low profile because not only did i plan sheep at the time, but i also want my baby calves to drink – and they do. A 2-3 foot tall tank will not allow a calf to drink for many months (because it’s not always full). So, i went with a Hastings sheep water tank that is 8 foot diameter, one foot tall and is lightweight enough for me to move around by myself plus it holds 342 gallons of water! Well, realistically 300, but that’s still a good amount of storage. I have 10 of these tanks in use with no problems so far in 5 years.
The technical stuff: It’s a Dankoff Solar pump. Pumping through 4500 feet of HDPE pipe which are connected with Philmac fittings. The pump house was built by MSF Farm Mike and Jeff Fries, Linneus MO. They also assembled all the pump and installed it inside the house and attached and wired the solar panel to the top of the house to make a seamless, easy to use and move system. To install all the workings, they also dug out to my pond drain pipe and tied into the pond and set up the shut off valves for that as well. It was a big job. As an aside, they also installed the solar panel on a tall pole for my electric fence.
Initially, there was one battery installed, but that is absolutely not enough. I’m using two now and that is fine unless there is a long period of no light. With two batteries, the pump will continue for a theoretical 90 minutes before the batteries are drained. Once the batteries are drained, they will NOT recharge and allow the system to start again once the sun starts shining. They must be at least a little charged before the solar panel will charge them again. This is a protection of the system so that the pump won’t keep trying to kick on every time there is a hint of sunshine. In my opinion, there should be a way to keep the battery from completely draining, then a meter that only allow the pump to start again when the batteries are fully charged. So, what happens when the batteries are completely drained? I have to undo the connections and load them into my Gator and haul them home to a charger, charge them overnight, then take them back and hook back up. Perhaps not a big deal to most, but those batteries weigh at least 50 lbs each.
However, this year, once i got it all going, i’ve had no shut down now for over a month. Very happy.
Elevation: the solar pump, panel, pressure tank, and housing are all located below the pond at about 817 feet above sea level. There seems to be little loss of pressure to the furthest point of 3480 feet undulating between 817 and 874.
My system is all fair weather and above ground. This means that i wait until there is no freezing in the forecast before firing it up.
Spring preparation:
replace plugs in tanks
replace plug in water filter
Install batteries and connections
Wash off solar panel
Remove any wasp nests from inside enclosure
Make sure ground wire is in place
Turn on water at pond to make sure good flow, then turn off.
Connect pipe to pond outlet and flush, then connect to inlet valve
Turn on pond water, water will come out outflow valve – you will get wet
Connect outgoing pipe to outflow valve
If there are no leaks in the system, at this point just keep moving down the line as water flushes out the pipe and reconnect at each connection. It is important to flush the lines because i can guarantee there will be some mud and mice which have built homes in the line over the winter.
Finally, flushing out the end of the line before connecting to tank float assembly. Connect and allow tank to fill.
Just about guarantee that the tank will not be level, so you will have to watch it fill and make any float adjustments. If it cannot be kept from leaking over the side, shut off water valve at the tank. Either drain the tank (oh yeah, be sure to put the plug in the tank before filling) via tank plug or leaving it for the cattle to drink down. Use a 2×4 or some such to level the tank.
If the solar supply cannot be checked everyday, always let the cattle have access to a gravity fed water supply below a pond or to the ditch if there is water running there. When the weather gets hot, the cattle cannot be allowed to be without water. If this does happen, let them into a pond lot so they can all drink at once. Be vigilant and thoughtful as to water supply.
Fall shut down and drain: BEFORE freezing weather arrives
Unplug the pump, shut off solar panel access, place arm in ‘off’ position
Shut off water from pond
Remove pipe from shut off valve
Using channel lock pliers or some such, remove large nut from the bottom of the water filter
At this point, walk outside the gated enclosure, then to the north and find the connection. Remove it using two channel lock pliers. You will get wet, but once detached, quickly pull the pipe towards the ditch to the east. Water from all the pipe will come rushing out!
While that is happening, go back to the pump and remove outflow and inflow pipes from fittings. Making sure there is no freeze points. Remove plugs from tanks as indicated and make sure they drain.
Remove connections from batteries and take the batteries home to a warm place. Don’t allow a discharged battery to freeze. They can discharge in the winter without you knowing.
The little trailer is all set and hooked up to the water system. Solar panel on top is 550 watts and available as part of this system that Mike Fries, Linneus, MO builds. My panel is set below a pond with the bank to the west. This means that sunlight in the fall can be very iffy in the late afternoons. Consider shutting it down as needed.
Another view of the trailer. The pump does not fill this pictured tank; it is fed by gravity flow from the pond above.
Very handy – nay, imperative, to have quick coupler with individual shut off at each tank. This allows for flushing of the line all the way to the tank and also allowing the ability to shut off the tank when not in use. This assembly easily screws into the Philmac 1.5 inch female adapter.
Nice flow through the valve – flushing and checking before quick coupling to the hose to the float assembly in the tank.
Full flow fill through pipe and into tank makes for 6-7 gallon fill per minute. Float arm and tank assembly all put together by MSF Farm, Linneus, MO.
I keep a photo of the wiring configuration inside the pump house because i can’t remember from year to year how to wire it up properly! Good grief – the battery recommends ‘team lifting’! Where am i going to get a team? I gotta pack that sucker myself up, out and around, and lift into the Gator.
All the above photos are the insides and working parts – MSF Farm will put this all together for you based on your own situation.
Now that I’m done writing up this entry, my system is down. 😦 It seems calves hit the fence near a tank which allowed them to bump the float and the water was overflowing which caused the batteries to be drawn down – yup, i’ve got them in the back of the Gator, brought home, and now charging.
Somehow we always manage to wait until it turns cold before we realise the water tanks must be dealt with. At least it wasn’t uncomfortably cold. I already had two tanks drained, but still had one more to go, and two to turn on the leak valves so they won’t freeze. I chopped out soft ice about an inch thick that had formed on the surface. My husband had dozens of tanks to deal with!
Cheers
tauna
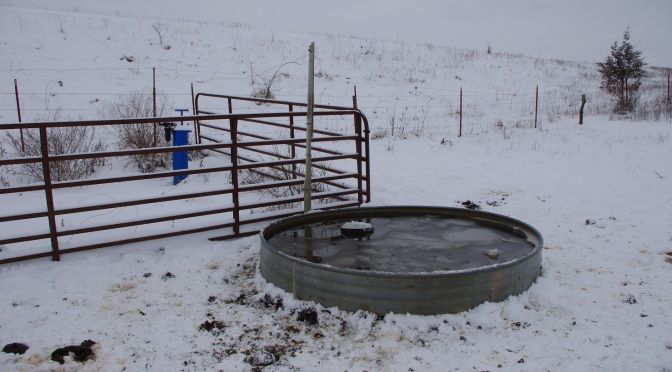
The little bubble indicates that the leak valve is open, allowing water to flow constantly thereby keeping the water moving so that it won’t freeze. Plus with cattle drinking, warmer water from the pond continues in through the regular valve. Since we don’t want the water to flow over the side of the tank making a muddy or icy situation, the excess water flows through the overflow pipe in the middle of the tank and is piped some 20-30 feet away underground. Usually into a ditch or creek.
Cold temperatures have descended on north Missouri today and forecasted to hang around for at least the next 10 days! With the ground already frozen, these continued below freezing temps made
it tough to set up the sheep electric netting fence. Thankfully, I put up netting around several large bales of hay and running water for the sheep to stay put until the weather breaks, though I may have to chop ice if we don’t get any snow. Sheep really don’t need water if there is snow available.
No longer am I trying to graze the road banks with the sheep. Moving them down the bank is like pushing water now and with the ground frozen, it’s far too difficult to install the Kencove sheep netting fence. At this point, grazing the banks in the spring after green grass starts coming on will be the next time they are pushed out. Sheep grazing the banks eliminates the need for me to mow the banks with the brush hog, but it is extra work.
Cattle are a different story in the water department. If there is plenty of heavy, wet snow, they won’t drink much, but if that’s what we have, it destroys the stockpiled winter forage for them to graze much faster than just being frozen or a light snow. However, with a light snow, they will need fresh flowing water available. Therefore, in anticipation of freezing weather, I filled the water tank and opened the leak valve so that the water will fill the tank and then continue running over the top of the overflow pipe. Flowing water will not freeze easily – especially if the cattle are drinking from it. The drawback to overflow is that the water is draining the pond from which it originates, though in Missouri, this is usually refilled easily when spring rains come.
Winter grazing with the lack of grass regrowth allows us to strip graze whatever size breaks we want to give the cattle or sheep. If I know I’ll be back up to the farm the next day, I’ll give the cows a very small break of forage so that they won’t walk all over it and ruin it before grazing. However, if it will be several days or if it’s going to be extra cold, I’ll set up a bit larger break. The breaks are fenced with one strand of Powerflex Fence electrified polybraidfence and step-in posts for easy set up and tear down. I use two lines and leap frog them across the paddocks – allowing enough quality forage to maintain a healthy condition on the animals. Strip grazing versus free access will vastly increase utilisation resulting in, on average, about 60% more grazing days! Additionally, manure is more evenly distributed across the paddock. (my paddocks average about 20 acres each). My cows and calves require about 6500 lbs of dry matter per day, so accurately estimating the amount of forage per acre is crucial, then I open up enough acres for the cows to graze however many number of days I want.
Happy Grazing!
tauna
Sheep bale grazing near a small patch of timber.
Going for the green!
Cattle grazing through snow – strip grazing stockpiles forage