I didn’t think i’d ever go back to calving out 2 year old heifers (exposing to the bull at 13-15 months) since calving out as 3 year olds is so incredibly stress free on the heifer and myself. A high percentage of 2 year olds will become pregnant and zero will need assistance at calving.
Since beginning total grazing and recognizing that i need to grow my herd numbers significantly and quickly (due to being understocked), i decided to take a chance last year with the 14 yearling heifers and have them bred alongside the main cow herd. As shared before, these heifers had a pregnancy rate of 76% (vs 90% + as 2 year olds) and one heifer died, along with her calf, at calving due to difficulty (front leg was back) and another heifer had her calf fine, but it was dead (don’t know why).
It will be interesting to see how many of those will breed back this year. However, I have discovered that those which calve first time as 3 year olds don’t breed back at much higher, if any, rate as the 2 year olds. I don’t know why, but that has been my experience.
This year, to hopefully avoid more calving difficulties, I have kept the 21 yearling heifers separate from the main cow mob and they are joined with a 2 year old 1/4 Corriente x 3/4 Red Angus bull out of one of my good adapted cows (#433) and a 1/2 Corriente x 1/2 Red or Black Angus yearling bull out of my good purebred 21 year old Corriente cow (#160). This should eliminate any calving difficulties but will reduce the value of each calf because of the Corriente influence. This should be less of a hit than dead heifers, calves, and/or having to assist.
After, the bulls are removed from both the cow mob and the heifer mob, the two groups will be put together into one group for grazing through the winter.
Another thing i may do is wean the calves off the first calf heifers and feed the weaners through the winter allowing the heifer to rebuild body condition better for her next calving event. Haven’t decided on that yet. Sounds like work.
Considerations:
Pros for calving at 2 years
selecting most fertile stock
entering production a year earlier
open heifers can be kept for trying again the next year or selling as grassfinished beeves.
Cons for calving at 2 years
keeping a separate mob before and during breeding season
possibly having to wean/feed calves
increased incident of calving difficulties
Farming and ranching are dynamic businesses requiring flexibility, creative planning, and constant learning. The ability to identify a problem is a must as is adjusting the plan and expectations to remedy the situation as quickly as possible. Finding and purchasing cattle to graze and perform in a managed grazing (in my case now total grazing) is next to impossible. Growing the herd size with your own adapted animals is a slow process, but has shown itself to be the better answer for me in all animal groups; heifers, bulls, and cows.
Shabbat Shalom!
001 is not the fanciest bull in the land, but this 2 year old has shown himself prolific as a yearling, sound on his feet, and clear eyes. He is out of now 8 year old cow who has been a consistent producer. He is quiet and easy to handle. He is 1/4 Corriente and 3/4 Red Angus.This yearling bull seems to be whispering sweet nothings in this heifer’s ear! Here’s theyearling bull i chose to join with the 2 year old bull. Although it’s likely the 2 year old can easily service 21 heifers, I’ve had a bad experience having only one bull with a mob – they ALL came up open (not pregnant) That was a very expensive mistake. This 102 bull is also home raised and not fancy, but out of my 21 year old purebred Corriente cow – so adaptation, longevity, and soundness are built in. He is also clear eyed, slick hided, of good disposition, and healthy from birth. He is 1/2 Corriente and 1/2 Red or Black Angus (his coloring makes it tricky to call). His mum is solid red.
To all there is an appointed time, even a time for every purpose under the heavens: a time to be born, and a time to die; a time to plant, and a time to pull up what is planted; a time to kill, and a time to heal; a time to tear down, and a time to build up; a time to weep, and a time to laugh; a time to mourn, and a time to dance; a time to throw away stones, and a time to gather stones; a time to embrace, and a time to refrain from embracing; a time to seek, and a time to let wander away; a time to keep, and a time to throw away; a time to tear, and a time to sew together; a time to keep silence, and a time to speak; a time to love, and a time to hate; a time of war, and a time of peace. Ecclesiastes 3:1-8 (Hebraic Roots Bible)
For the past several years, my cows have been bred to calve 15 April to 30 May. Though that is earlier than i prefer, it was a decision i made some 8 years ago because i was having up to 30% death loss in baby calves getting scours. Scours so bad that sometimes the calves would die before they even passed that first scouring poop! That was calving 15 May to 30 June. So after a great deal of research into the possibilities, i made the decision to push it back. And that made all the difference – not one single case of scours since that time.
Now, i did sell those cows which lost their calves, so that is likely a good part in the reason there are no longer any cases of scours, yet it’s not the full explanation. Corriente cows tend to have rich milk, which, combined with the heat caused by grazing toxic fescue and the outside air temperature may cause additional stress on baby calves.
However, today’s weather is a reminder of why April is too early in north central Missouri to start the calving. Although my calving season officially starts 15 April, there have already been 6 calves born – fortunately, the weather has been decent until today and it is pouring down cold rain, muddy conditions, temperature at 46F (wind chill 40F) and a stiff 14 mph NNW winter type wind. Very hard are on young and newborn calves.
So, yesterday, after hearing once again from Jaime Elizondo (others have advised as well and i know better), i plan to wait to turn in the bulls 23 July for 45 days. It is with trepidation that i make this change when, despite crappy April weather these past several years, i’ve not lost any baby calves.
Here is to change once again. On the other end of it, it’s always a problem to wean calves the first week of March when grass is yet so far away and there is bitter weather ahead of them. Calving later will allow me to wait another 2-3 weeks before weaning the following year and the cows will have better weather in which to regain good condition. However, leaving the bulls in a couple more weeks is the only way to avoid me being in ragweed season to remove them. (many of my decisions revolve around ragweed season due to me being incapacitated during that time)
So, what have i decided going forward? To completely avoid ragweed season, I plan to turn out the bulls about August 4 and pull them back out about 45 days later which is September 19. Hope it works!!!
Shabbat Shalom!
tauna
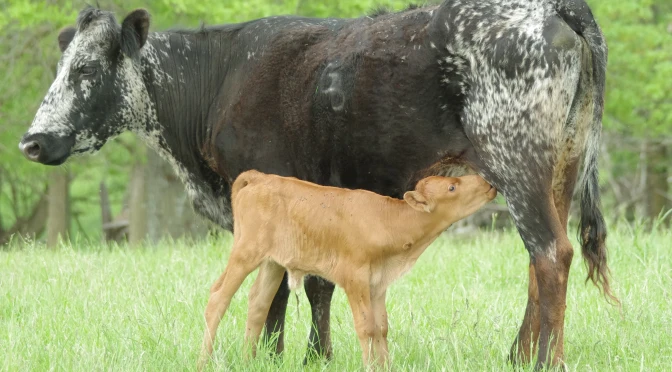
Calves born earlier – before the onset of toxic endophyte fescue – thrived! This Longhorn cow had a dandy heifer calf.Never plan to have cows calving in the winter! This was a purchased cow which the seller assured me they were spring calvers – he lied.
As you know from reading my blog, i really like Corriente cows. I’m nearly out of the purebred ones, but most of my replacements have a percentage of Corriente in them and that adds to the cross. It’s a slim profit raising Corrientes unless you can find a niche market. Also, they will not ‘finish’ like a beef cow, so are far too lean with next to no fat cover to make it profitable to butcher them. (However, the meat is absolutely outstanding and that is pretty much all we butcher for ourselves.) So they remain relegated to entertainment (rodeo).
Anyway, a short article came out in the most recent edition of Working Ranch and I’d like to share it with you.
THis entry will serve two-fold; one as a page in the handbook i’m assembling about my little Tannachton Farm – not the day to day stuff, but the month to month stuff that happens each year, and secondly to address the questions received about the details about the solar pump used on my farm. It’s been 5 years now in use and i guess the gremlins are chased out because it is working great this year – i do hope i didn’t just jinx it!
All of the pipe and tanks on the solar system are laid out on top the ground; not buried 4 feet. Why? When i applied for and received an EQIP organic transition NRCS government aid that was/is the protocol.
Water pipe: black polyethylene HDPE 1.5 inch pipe purchased in 500 foot rolls. So, i unrolled (by hand!) about 4500 feet of 1 1/2 inch HDPE black pipe over that top of the ground to the stock tanks. The pipe is connected using Philmac fittings of the same diameter. The use of 1.5 inch pipe eliminates a great deal of friction. Build drive over uprights to eliminate heavy vehicles driving over pipes in gateways.
Water tanks: 10 galvanised tanks purchased from Hastings Equity Manufacturing in Nebraska. I needed high volume tanks because of the number of animals i would be watering and i like a low profile because not only did i plan sheep at the time, but i also want my baby calves to drink – and they do. A 2-3 foot tall tank will not allow a calf to drink for many months (because it’s not always full). So, i went with a Hastings sheep water tank that is 8 foot diameter, one foot tall and is lightweight enough for me to move around by myself plus it holds 342 gallons of water! Well, realistically 300, but that’s still a good amount of storage. I have 10 of these tanks in use with no problems so far in 5 years.
The technical stuff: It’s a Dankoff Solar pump. Pumping through 4500 feet of HDPE pipe which are connected with Philmac fittings. The pump house was built by MSF Farm Mike and Jeff Fries, Linneus MO. They also assembled all the pump and installed it inside the house and attached and wired the solar panel to the top of the house to make a seamless, easy to use and move system. To install all the workings, they also dug out to my pond drain pipe and tied into the pond and set up the shut off valves for that as well. It was a big job. As an aside, they also installed the solar panel on a tall pole for my electric fence.
Initially, there was one battery installed, but that is absolutely not enough. I’m using two now and that is fine unless there is a long period of no light. With two batteries, the pump will continue for a theoretical 90 minutes before the batteries are drained. Once the batteries are drained, they will NOT recharge and allow the system to start again once the sun starts shining. They must be at least a little charged before the solar panel will charge them again. This is a protection of the system so that the pump won’t keep trying to kick on every time there is a hint of sunshine. In my opinion, there should be a way to keep the battery from completely draining, then a meter that only allow the pump to start again when the batteries are fully charged. So, what happens when the batteries are completely drained? I have to undo the connections and load them into my Gator and haul them home to a charger, charge them overnight, then take them back and hook back up. Perhaps not a big deal to most, but those batteries weigh at least 50 lbs each.
However, this year, once i got it all going, i’ve had no shut down now for over a month. Very happy.
Elevation: the solar pump, panel, pressure tank, and housing are all located below the pond at about 817 feet above sea level. There seems to be little loss of pressure to the furthest point of 3480 feet undulating between 817 and 874.
My system is all fair weather and above ground. This means that i wait until there is no freezing in the forecast before firing it up.
Spring preparation:
replace plugs in tanks
replace plug in water filter
Install batteries and connections
Wash off solar panel
Remove any wasp nests from inside enclosure
Make sure ground wire is in place
Turn on water at pond to make sure good flow, then turn off.
Connect pipe to pond outlet and flush, then connect to inlet valve
Turn on pond water, water will come out outflow valve – you will get wet
Connect outgoing pipe to outflow valve
If there are no leaks in the system, at this point just keep moving down the line as water flushes out the pipe and reconnect at each connection. It is important to flush the lines because i can guarantee there will be some mud and mice which have built homes in the line over the winter.
Finally, flushing out the end of the line before connecting to tank float assembly. Connect and allow tank to fill.
Just about guarantee that the tank will not be level, so you will have to watch it fill and make any float adjustments. If it cannot be kept from leaking over the side, shut off water valve at the tank. Either drain the tank (oh yeah, be sure to put the plug in the tank before filling) via tank plug or leaving it for the cattle to drink down. Use a 2×4 or some such to level the tank.
If the solar supply cannot be checked everyday, always let the cattle have access to a gravity fed water supply below a pond or to the ditch if there is water running there. When the weather gets hot, the cattle cannot be allowed to be without water. If this does happen, let them into a pond lot so they can all drink at once. Be vigilant and thoughtful as to water supply.
Fall shut down and drain: BEFORE freezing weather arrives
Unplug the pump, shut off solar panel access, place arm in ‘off’ position
Shut off water from pond
Remove pipe from shut off valve
Using channel lock pliers or some such, remove large nut from the bottom of the water filter
At this point, walk outside the gated enclosure, then to the north and find the connection. Remove it using two channel lock pliers. You will get wet, but once detached, quickly pull the pipe towards the ditch to the east. Water from all the pipe will come rushing out!
While that is happening, go back to the pump and remove outflow and inflow pipes from fittings. Making sure there is no freeze points. Remove plugs from tanks as indicated and make sure they drain.
Remove connections from batteries and take the batteries home to a warm place. Don’t allow a discharged battery to freeze. They can discharge in the winter without you knowing.
The little trailer is all set and hooked up to the water system. Solar panel on top is 550 watts and available as part of this system that Mike Fries, Linneus, MO builds. My panel is set below a pond with the bank to the west. This means that sunlight in the fall can be very iffy in the late afternoons. Consider shutting it down as needed.
Another view of the trailer. The pump does not fill this pictured tank; it is fed by gravity flow from the pond above.
Very handy – nay, imperative, to have quick coupler with individual shut off at each tank. This allows for flushing of the line all the way to the tank and also allowing the ability to shut off the tank when not in use. This assembly easily screws into the Philmac 1.5 inch female adapter.
Nice flow through the valve – flushing and checking before quick coupling to the hose to the float assembly in the tank.
Full flow fill through pipe and into tank makes for 6-7 gallon fill per minute. Float arm and tank assembly all put together by MSF Farm, Linneus, MO.
I keep a photo of the wiring configuration inside the pump house because i can’t remember from year to year how to wire it up properly! Good grief – the battery recommends ‘team lifting’! Where am i going to get a team? I gotta pack that sucker myself up, out and around, and lift into the Gator.
All the above photos are the insides and working parts – MSF Farm will put this all together for you based on your own situation.
Now that I’m done writing up this entry, my system is down. 😦 It seems calves hit the fence near a tank which allowed them to bump the float and the water was overflowing which caused the batteries to be drawn down – yup, i’ve got them in the back of the Gator, brought home, and now charging.
Boy, howdy, now there’s an exciting title and one to really pull in a reader eager to learn about such a thing. Well, not, of course, but to cattle farmers and ranchers across a great portion of the United States, it’s a reality that sucks an estimated $1 billion out of our collective pockets EACH year!
in 1943 Kentucky 31 variety of fescue was commercially introduced and sold, it seemed at first a godsend to sod forming, persistence, deep rootedness (soil conservation), and production for cattle and other livestock producers. In the late 1970’s, scientists at last identified that fescue hosts a fungus that can produce toxic compounds called ergovaline. However, it is important to note, that reports of toxic effects of grazing infected fescue have been around at least since the early 1900’s. Why didn’t the light bulb go off that there is a problem that needs addressing BEFORE scattering it all over the US!? The only answer that seems reasonable is that establishment of the grass is cheap and easy and the resultant health concerns in stock are a silent drain.
Whatever the case may be, I’m now on a mission to eradicate to a degree as much as possible toxic fescue from my pastures. In so doing, cattle health and numbers should increase, calf gains and cow milking ability should increase as well as reproduction improvements. Additionally, soil health and tilth should improve, thereby increasing its moisture capturing and holding capacity (resulting in less runoff and erosion). Lastly, but certainly not least, ridding the pastures of tall fescue will greatly improve wildlife habitat – especially ground nesting species such as quail.
The fruits of this project will likely be for the next generation and i ask myself if it is really worth the expense and effort to make a bold move in such uncertain times of low cattle prices. Time will tell, i guess.
I think I’ll put these entries in a separate category so my reports and progress can be easily accessed. I’m no Pioneer Woman like Dee, (ya gotta admire the outreach she has done with her whit and way with words), but if you have an interest in organic, no chemical, minimal tillage farming, pasture renovation, cattle rearing for producing clean healthy food while improving (regenerating is the popular term) our environment, come alongside and join the conversation. I will enjoy any questions.
Cheers!
tauna
This is a nice photo of my cows, but what you don’t see is that a good portion of what they are grazing is toxic endophyte infected fescue. In other words, with every bite they are being poisoned. It’s time to see if the dollars and cents to renovate make sense to change this condition.
Corriente Cattle Corrientes are raised primarily for sports cattle, while preserving such natural attributes as high fertility, early maturity, trouble-free calving, and foraging efficiency, as well as disease and parasite resistance. This unique breed differs greatly in conformation, behavior and hardiness from cattle raised only for meat. Most of the production problems experienced by today’s cattlemen are a result of increasing size and weight in order to fit the current commodity market. Corrientes remain untainted by the manipulative animal husbandry which has affected and weakened many domestic animals.
The Corriente is a small, agile, athletic animal with stamina, heavy horns, and a gentle disposition. These characteristics make the Corriente an ideal animal for team roping, bulldogging and an excellent choice for cutting and team penning.
Calf roping – While it may seem cruel to rope these calves – bear in mind that these calves are very well cared for throughout their lives. They ‘work’ for about 10 seconds every few nights until they are too big for roping or wrestling. Note the condition and health of the calf featured in this photo. Photo courtesy of North American Corriente Association.