THis entry will serve two-fold; one as a page in the handbook i’m assembling about my little Tannachton Farm – not the day to day stuff, but the month to month stuff that happens each year, and secondly to address the questions received about the details about the solar pump used on my farm. It’s been 5 years now in use and i guess the gremlins are chased out because it is working great this year – i do hope i didn’t just jinx it!
All of the pipe and tanks on the solar system are laid out on top the ground; not buried 4 feet. Why? When i applied for and received an EQIP organic transition NRCS government aid that was/is the protocol.
Water pipe: black polyethylene HDPE 1.5 inch pipe purchased in 500 foot rolls. So, i unrolled (by hand!) about 4500 feet of 1 1/2 inch HDPE black pipe over that top of the ground to the stock tanks. The pipe is connected using Philmac fittings of the same diameter. The use of 1.5 inch pipe eliminates a great deal of friction. Build drive over uprights to eliminate heavy vehicles driving over pipes in gateways. 

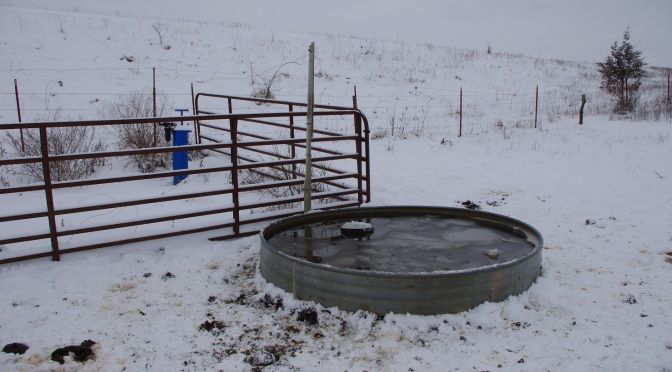
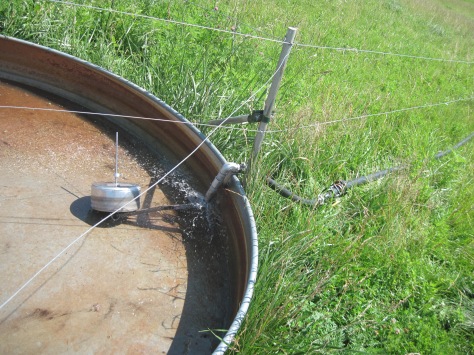
Water tanks: 10 galvanised tanks purchased from Hastings Equity Manufacturing in Nebraska. I needed high volume tanks because of the number of animals i would be watering and i like a low profile because not only did i plan sheep at the time, but i also want my baby calves to drink – and they do. A 2-3 foot tall tank will not allow a calf to drink for many months (because it’s not always full). So, i went with a Hastings sheep water tank that is 8 foot diameter, one foot tall and is lightweight enough for me to move around by myself plus it holds 342 gallons of water! Well, realistically 300, but that’s still a good amount of storage. I have 10 of these tanks in use with no problems so far in 5 years.
The technical stuff: It’s a Dankoff Solar pump. Pumping through 4500 feet of HDPE pipe which are connected with Philmac fittings. The pump house was built by MSF Farm Mike and Jeff Fries, Linneus MO. They also assembled all the pump and installed it inside the house and attached and wired the solar panel to the top of the house to make a seamless, easy to use and move system. To install all the workings, they also dug out to my pond drain pipe and tied into the pond and set up the shut off valves for that as well. It was a big job. As an aside, they also installed the solar panel on a tall pole for my electric fence.
Initially, there was one battery installed, but that is absolutely not enough. I’m using two now and that is fine unless there is a long period of no light. With two batteries, the pump will continue for a theoretical 90 minutes before the batteries are drained. Once the batteries are drained, they will NOT recharge and allow the system to start again once the sun starts shining. They must be at least a little charged before the solar panel will charge them again. This is a protection of the system so that the pump won’t keep trying to kick on every time there is a hint of sunshine. In my opinion, there should be a way to keep the battery from completely draining, then a meter that only allow the pump to start again when the batteries are fully charged. So, what happens when the batteries are completely drained? I have to undo the connections and load them into my Gator and haul them home to a charger, charge them overnight, then take them back and hook back up. Perhaps not a big deal to most, but those batteries weigh at least 50 lbs each.
However, this year, once i got it all going, i’ve had no shut down now for over a month. Very happy.
Elevation: the solar pump, panel, pressure tank, and housing are all located below the pond at about 817 feet above sea level. There seems to be little loss of pressure to the furthest point of 3480 feet undulating between 817 and 874.
My system is all fair weather and above ground. This means that i wait until there is no freezing in the forecast before firing it up.
Spring preparation:
- replace plugs in tanks
- replace plug in water filter
- Install batteries and connections
- Wash off solar panel
- Remove any wasp nests from inside enclosure
- Make sure ground wire is in place
- Turn on water at pond to make sure good flow, then turn off.
- Connect pipe to pond outlet and flush, then connect to inlet valve
- Turn on pond water, water will come out outflow valve – you will get wet
- Connect outgoing pipe to outflow valve
- If there are no leaks in the system, at this point just keep moving down the line as water flushes out the pipe and reconnect at each connection. It is important to flush the lines because i can guarantee there will be some mud and mice which have built homes in the line over the winter.
- Finally, flushing out the end of the line before connecting to tank float assembly. Connect and allow tank to fill.
- Just about guarantee that the tank will not be level, so you will have to watch it fill and make any float adjustments. If it cannot be kept from leaking over the side, shut off water valve at the tank. Either drain the tank (oh yeah, be sure to put the plug in the tank before filling) via tank plug or leaving it for the cattle to drink down. Use a 2×4 or some such to level the tank.
If the solar supply cannot be checked everyday, always let the cattle have access to a gravity fed water supply below a pond or to the ditch if there is water running there. When the weather gets hot, the cattle cannot be allowed to be without water. If this does happen, let them into a pond lot so they can all drink at once. Be vigilant and thoughtful as to water supply.
Fall shut down and drain: BEFORE freezing weather arrives
- Unplug the pump, shut off solar panel access, place arm in ‘off’ position
- Shut off water from pond
- Remove pipe from shut off valve
- Using channel lock pliers or some such, remove large nut from the bottom of the water filter
- At this point, walk outside the gated enclosure, then to the north and find the connection. Remove it using two channel lock pliers. You will get wet, but once detached, quickly pull the pipe towards the ditch to the east. Water from all the pipe will come rushing out!
- While that is happening, go back to the pump and remove outflow and inflow pipes from fittings. Making sure there is no freeze points. Remove plugs from tanks as indicated and make sure they drain.
- Remove connections from batteries and take the batteries home to a warm place. Don’t allow a discharged battery to freeze. They can discharge in the winter without you knowing.


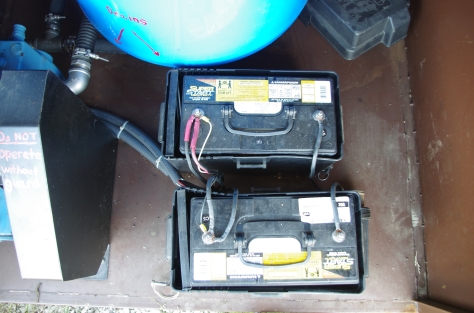
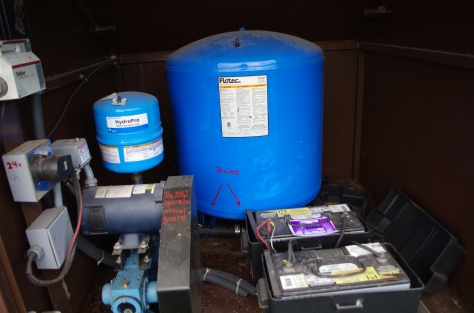


All the above photos are the insides and working parts – MSF Farm will put this all together for you based on your own situation.
Now that I’m done writing up this entry, my system is down. 😦 It seems calves hit the fence near a tank which allowed them to bump the float and the water was overflowing which caused the batteries to be drawn down – yup, i’ve got them in the back of the Gator, brought home, and now charging.
Such is life!
Cheers
tauna